Live Crickets Care, breeding and feeding
Click here to go to our cricket order page
Ā
by WORM MAN
Crickets are one of the best live insects for feeding pets, bait, and for profit.  I put
this together for the small grower who wants to get started with crickets but
doesn't want to spend a fortune on equipment.   You can get started with
crickets with some odds and ends that you can find around your house.
Let's start with which cricket can be raised in confinement. The cricket that is
To start, all that is needed is some sort of container to act as a
brooder/incubator.  The container must be large enough to provide room, but
not so large that it cannot be heated.  You can use a garbage can, a
Rubbermaid container, a wooden box, an aquarium, or any type of container
that will allow free movement, air flow, heating, and room for all of the
components necessary to successfully breed crickets.
The first question to ask is How many crickets do you want to breed?  The
answer to this question will determine the size of the container you will need
and how many breeder crickets you will need.  There are male and female
crickets.  Each female will lay about 100 eggs in her lifetime, and she will lay
about 5-10 per day until 100 is reached.  They sometimes lay more or less, but
you can bet on approximately 100.  If you want to have 1000 crickets, you will
have to start with at least 10 female crickets and 10 male crickets.  You will
also have to provide space for 1000 crickets.  One thousand crickets take up a
great deal more space than 20 crickets, so you have to plan ahead.  A
20-gallon Rubbermaid container or a 20-gallon fish tank
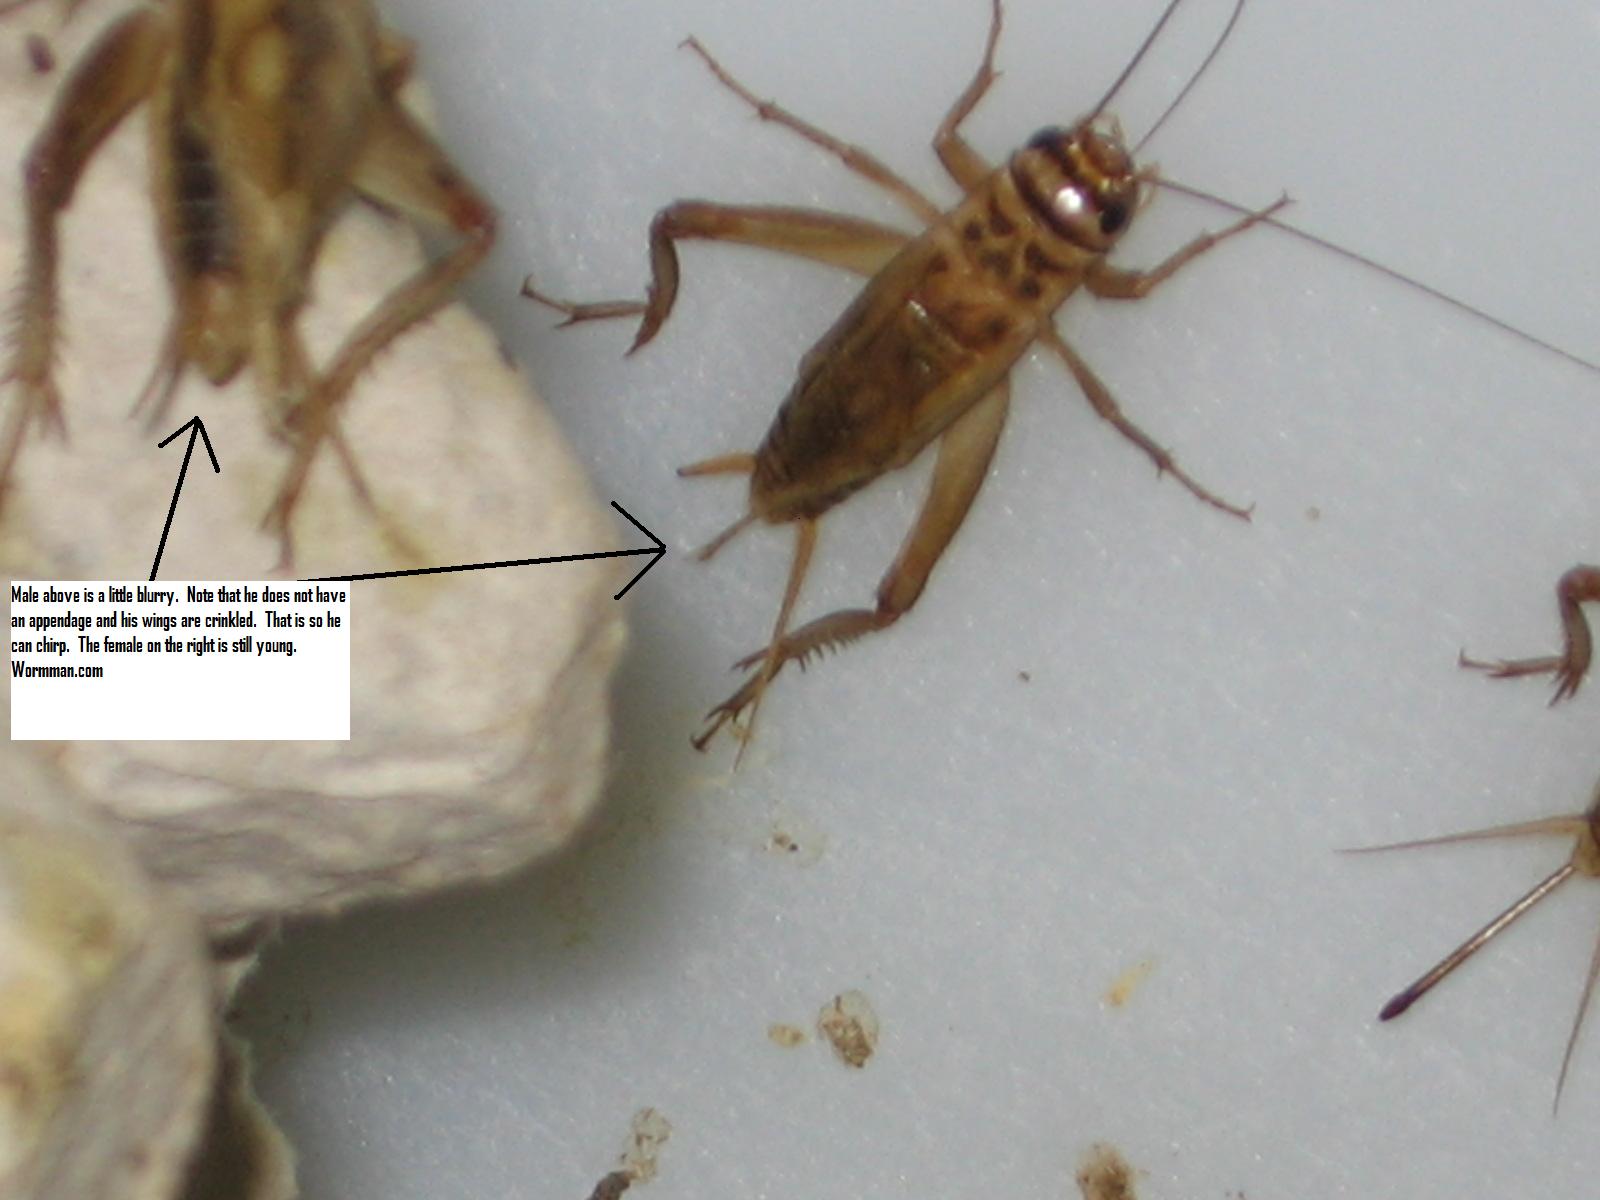
How do you distinguish the males from the females?  The female cricket has
three long extrusions on her back and fully developed wings.   The male cricket
has two extrusions.  In the female, the extrusion is called the ovipositor.
This is the sexual organ of the female cricket and is what is used to lay eggs.
The female will stick the ovipositor into the soil and lay eggs.  The ovipositor
will deposit the eggs beneath the surface of the soil or bedding material you
will furnish to house the eggs before hatching.
Back to the box.  The container you will use must be escape-proof from the
inside and out.  You do not want critters getting in as much as you do not want
crickets escaping.  The enemies of the cricket are numerous:  centipedes,
millipedes, spiders, and a whole host of insects find crickets an attractive
addition to their daily menu.  Crickets are excellent climbers and jumpers, so
the container has to be closed on all sides.
The container has to also provide air and heat.  Crickets need fresh air to stay
healthy and to breed.  The best way to provide air is to use some sort of cover
that allows the passage of air but one that doesn't have holes.  A piece of cloth
secured over the top can provide air and no escape for your crickets or
entrance for the enemies of the crickets.  Use of cheese cloth, an old shirt, or
any old cloth will work.  Try to boil it first so that any bacteria in the cloth is
killed before use.
Once you have decided upon a container, your next problem will be to figure
out how you will provide heat for the crickets.  Crickets breed and grow best in
a temperature of about 88 degrees.  They will breed at lower temperatures, but
you will have a higher mortality of the young and a lower egg lay rate.  There
are a number of ways to heat the crickets.  You can keep the crickets in a warm
room.  For instance, you can keep the cricket bin near a furnace or other
heating source.  Another way is to heat the bin.  You can do this by using a
heating element like the type used for heating reptiles, or you can heat the bin
using a light bulb.  In the case of a bulb, you have to make some provisions so
that the bin does not get too hot and kill the crickets or start a fire.  A
thermostat can be added to the bulb.  This will cost a couple of dollars, but you
will be able to set the thermostat on 88 Degrees and get optimum growth from
your crickets.  I prefer using a warm room or using a reptile type heater.  This
will minimize the chance of a fire.
Choose your heating method and then gather up the rest of your supplies.  You
will need a food dish.  A shallow dish will work well.  A cap or cover from a
peanut butter container works well.  You will also need a water dish.  Crickets
should not have access to an open water dish.  An open dish will cause
drowning, bacteria growth and will sour the entire culture.  Try to give the
crickets water in a different way.  There is a new product available that will
allow water in gel form.  This stops many of the problems that used to pervade
breeding and raising crickets.  You can also set up a ?wick watering system.?
This type of system allows the crickets to get water from a dish through a
sponge or cotton. If you use this method, you must remember to change the
cotton or sponge every couple of days so that you will not have a build-up of
bacteria.  You can also give water another way, which is the way that we
recommend, by using a slice of fruit or potato every couple of days.  The
crickets will get water and food from the slice.
Use chicken mash as a food for your crickets.  Egg layer mash works well.  Heat
the mash in an oven to kill bacteria before giving it to the crickets.  The
container should also be cleaned really well so all bacteria is killed.
You will also need some sort of substrate so the crickets can lay eggs in it.
There are two ways of doing this. One way is to place removable egg laying
containers in the main containers. These containers can be something like a
margarine container or some sort of soup container.
After your crickets have laid eggs in the substrate for a few days, you can move
the breeders to a second container to lay eggs in there, or leave them for the
full ten days and then remove the breeders to feed pets, to go fishing, or for
resale.  After two days, you will want to remove the breeders so that they do
not eat any crickets that have started to hatch.  Breeders sometimes eat the
babies if they can catch them.  Removing the breeders stops this and ensures
you will have all one size growing together.
Keep the babies in the brooder/incubator until half grown.  Then, move them
to a storage container.  A sweater box works well as a storage container.  You
can place the container in a cooler room to slow growth and development.  At
this stage, the crickets do not need the sand but do need food and water.
Using chicken mash and fruit and vegetable slices will help provide these
needs.  Do not allow the vegetables to get stale or moldy.  Replace the slices
every couple of days.
That's it for care and breeding.  You will now need to sell your crickets.  Pet
shops and bait shops buy large amounts of crickets.  There are companies that
raise and sell only crickets and do extremely well.  You can market your
crickets to local pet shops.  In the year 2000, crickets will go for about five
cents to ten cents each.  This is a great price and can make you a great deal of
money.  Call pet and bait shops in the area and ask them if they would be
interested in trying your crickets.  Explain the plusses of buying crickets from a
local breeder, such as:  no shipping costs, no shipping strain on the crickets,
and the ability of the shop owner to have you service their needs right away.
You can also look into placing local advertisements telling customers that you
have crickets.  Advertise specials in free local papers or low cost papers.
Find out what the shops charge per cricket and advertise a lower price.  You
will get buyers.  You can easily make $10,000  per year in a basement or spare
room.
Finally, shipping crickets is easy.  A one foot square box can hold 1,000
crickets.  Make sure that the box is taped securely on all sides.  In one of the
sides, cut a rectangle with a knife and staple and glue a screen in the box so
the crickets can get air during shipping.  If you are shipping in the winter to
cold areas, you may need to add heat packs to the boxes.  These are usually 48
hour packs and will get your crickets where they are going with enough heat to
keep them healthy.  You can ship the crickets through USPS Priority Mail, Air
Mail, UPS, or Overnight.  We ship Priority and Air Mail and have had great
results.  As of now, there are not any regulations against shipping crickets.
However, that may change some day.
Good Luck with your cricket venture!
|
 This
This


Ā